Microcontroller Circuit
PIC


Arduino Hookup Guide
Signal | Arduino Pin |
Forward | Digital Pin 8 |
Backward | Digital Pin 9 |
Left | Digital Pin 10 |
Right | Digital Pin 11 |
Green LED | Digital Pin 7 |
Red LED | Digital Pin 6 |
Horn | Digital Pin 5 |
The Freeduino MaxSerial serial port can be connected with any standard serial cable to the serial port on the router.
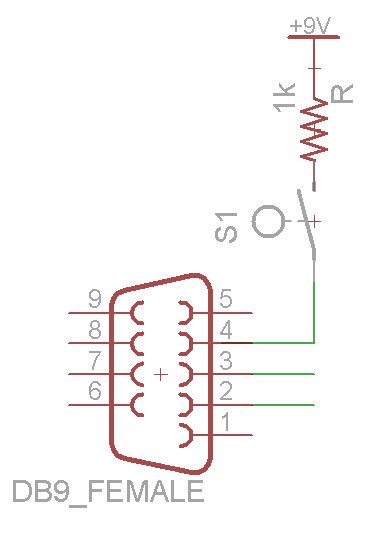
The Freeduino MaxSerial uses serial pin 4 - DTR (data terminal ready) to reset the microcontroller and allow it to download new code. Under normal PC operation this pin is either +10V or -10V depending on whether the serial port is connected or not. However, this pin is grounded on the router serial port and isn't active. When the router serial port starts sending data, the MaxSerial resets. That's no good for us. We are going to pull-up the DTR pin to +9V. With this quick hardware modification, it basically adds a program-locked mode so that new code can't be uploaded and the microcontroller can't be reset by the serial port. If you need to reprogram it, just flip the switch. +9V is a pin with easy access on the Freeduino MaxSerial.
Note: If you're using a usb version of the Arduino, you may be able to just connect the RX & TX pins to a MAX232A and then to the router serial port and may not need this modification. I only have the MaxSerial version, so I can't verify either way.
Camera


(Left Image Source: http://panasonic.co.jp/pcc/products/en/netwkcam/lineup/bl-c1/partnames.html)
One of the coolest aspects of this project is the fact that the car can be driven without line of sight. That is accomplished using a network camera. The one I chose was the Panasonic BL-C1A. It was basically the cheapest wired network camera with good reviews. The software is Windows-only and isn't great, but it's usable. The software is required to get the live streaming view. More expensive models can be had that have pan and tilt capability, but they are considerably more expensive and I didn't need that functionality.
Edit:
As a couple of the commentors have pointed out, the camera actually has a very usable web interface making it not a Windows-specific device. You can view the live feed using the following command:
http://<camera_ip>/ImageViewer?Resolution=320x240?Quality=standard
Available resolutions are 640x480, 320x120, and 160x60. Available quality (compression) settings are precision, standard, and motion.
There's a good summary of the commands and review of the camera at this blog.

(Dimensions Images Source: http://panasonic.co.jp/pcc/products/en/netwkcam/lineup/bl-c1/partnames.html)
The video quality is quite good. However, it will often freeze at a frame for about 1 second and then start streaming again. Even with good connectivity. I'm guessing its controller isn't powerful enough to auto-focus and also keep streaming at times. Overall I'm happy with it.
See the measurements and benchmarks section below for bandwidth requirement measurements.
Looking at the inside of the camera it looks like its running on an ARM processor at 250MHz. According to their parts website, it also includes 64MB of RAM. I wonder how hard it would be to get Linux running on this thing...
Horn


I wanted to add the fun feature of being able to honk at people. It was a pretty simple addition. I bought a $3 buzzer for KW Surplus and hooked it up to the microcontroller using a transistor for greater voltage and current.
No comments:
Post a Comment